Lossless Extract Cd Ripping
How to Rip Audio CDs to FLAC with Lossless Extract
cd extraction isn’t that sexy now days since every audio app has that capability by default, and it doesn’t get a lot of love around here. However, it’s still worth doing if you have a large collection of cds and want to free up space and get rid of them. Your CD collection deserves better than lossy MP3s. With Lossless Extract, you can rip every disc to perfect FLAC files — complete with automatic album art and track metadata — in literally just two clicks, on both Mac and Windows.
Why Lossless Matters for CD Ripping
CDs store audio in the Red Book standard: 44.1 kHz, 16-bit, stereo PCM — the same data used in studio masters. When you rip to MP3 or AAC, you permanently discard audio information that can never be recovered. FLAC compresses that same data losslessly — your rip is bit-for-bit identical to the original disc at roughly half the uncompressed file size. Lossless Extract produces exactly this kind of archive-quality rip.
What You Need Before You Start
- Lossless Extract installed on macOS 13+ or Windows 10 64-bit (1809+) or LInux Debian or Ubuntu
- An internal or external USB optical drive
- The Audio CD you want to rip
- An internet connection (for automatic MusicBrainz metadata lookup)
- Enough free disk space — FLAC CD rips are typically 200–400 MB per album
macOS tip: Go to Finder → Settings → General and make sure “CDs, DVDs, and iPods” is checked so your disc mounts on the desktop, so you can drag it into Lossless Extract’s Drop Zone.
Step 1 — Insert and Load the CD
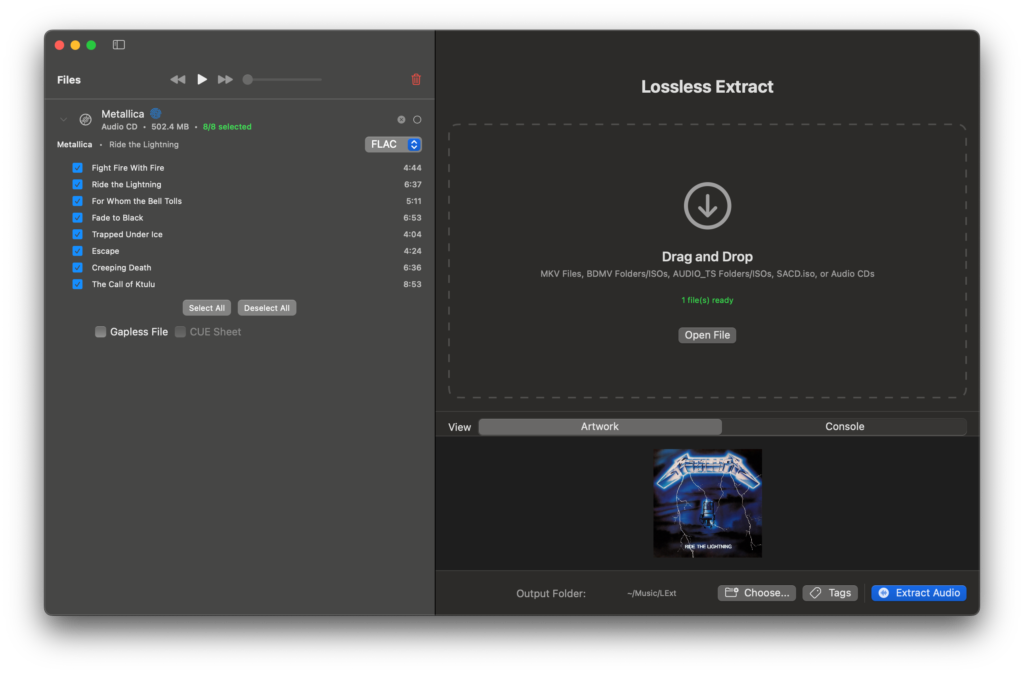
Insert your Audio CD into the drive. It will mount automatically — on macOS at /Volumes/Audio CD, on Windows as a lettered drive. Drag the mounted Audio CD volume icon from Finder or Explorer directly into the Lossless Extract window. The app reads the disc’s Table of Contents and displays all tracks within seconds.
Prefer not to drag? Use File → Open (⌘O) or click the Open File button in the drop zone. You can also drag the disc straight onto the app’s Dock icon on macOS — it’ll launch and load automatically.
Step 2 — Automatic Metadata from MusicBrainz
On first insertion, Lossless Extract automatically queries MusicBrainz using the disc’s unique ID. If a match is found, the artist name, album title, track names, release year, and artwork fill in automatically — no typing required. This metadata is cached locally so future insertions of the same disc are instant.
If your disc isn’t in MusicBrainz or the result is wrong, you have two options:
- AcoustID fingerprinting — click the fingerprint icon next to the artist name. The app samples around 120 seconds of audio, generates an acoustic fingerprint, and queries the AcoustID and MusicBrainz databases. If a match is found, all track names update automatically. Try Track 2 or 3 if Track 1 doesn’t return a result.
- Manual editing — double-click any track name or Artist and Album to edit it directly. Delete the text and press Enter to revert to automatic metadata.
Step 3 — Select Your Tracks
Each track shows its title, and duration. Check the box next to each track you want to rip, or use the Select All / Deselect All buttons. A counter at the top shows how many tracks are queued (e.g. “10/12 selected”), turning green once you have an active selection.
Want to preview a track before ripping? Click the play button (▶) next to any track. CD tracks play directly from the mounted disc with full seek support — no pre-extraction needed.
Step 4 — Choose Your Output Format
Audio CDs support three output formats in Lossless Extract:
FLAC — Lossless, recommended. Best for archiving, music servers, and audiophile playback. Saves around 50% space compared to WAV with zero quality loss.
WAV — Lossless, uncompressed. Best for pro audio workflows and maximum player compatibility.
MKA — Original codec, no conversion. Best when you specifically need to preserve the source stream in a container.
For almost every use case, choose FLAC. It’s supported by every major music player — Plex, Jellyfin, Kodi, Apple Music, foobar2000, VLC, and more.
Step 5 — Gapless Extraction and CUE Sheets (Optional)
By default, Lossless Extract rips each track as a separate file. If you’d prefer a single continuous file — ideal for live albums, classical recordings, or anything meant to play without interruption — check the Gapless File option and cuesheet in the bottom of the file info before extracting.
When using Gapless mode, also enable CUE Sheet generation. This creates a companion .cue file that acts as a table of contents, letting compatible players (foobar2000, VLC, JRiver) jump to individual tracks within the single file. You get seamless gapless playback and per-track navigation at the same time.
Step 6 — Extract
Click the Extract Audio button at the bottom of the window. A progress bar tracks the rip in real time. When complete, your FLAC files will be in the output directory — named by track number and title, with metadata already embedded. Double-click the output path to open the folder and verify your files.
Step 7 — Add Album Art and Full Metadata Tags
After extraction, click the Tags button in the toolbar. Search for your album by artist and title — Lossless Extract queries MusicBrainz and shows matching releases with artwork previews. Select the right one, then click Save Tags to Files. The app embeds artist, album, year, track numbers, titles, and cover art directly into every FLAC file.
Prefer your own hi-res scan? Open the artwork tab and drag a JPG or PNG into the artwork area before clicking the write tags to files button in the tag panel.
Troubleshooting
Disc not detected: On macOS, confirm “CDs, DVDs, and iPods” is enabled in Finder → Settings → General. Eject and re-insert if needed.
Wrong metadata loaded: Try the AcoustID fingerprint button, or double-click any track name to edit it manually.
Tags not showing in your player: Force a library rescan. Tags are embedded in the files — some players cache old data.
CD unmounts mid-rip: Avoid accessing the disc in Finder while extraction is running. Eject and re-insert — the app remembers your selections.
Need to reset cached metadata: Delete the relevant XML file from ~/Library/Application Support/LExt/Metadata/ on macOS, or C:\Users\User\AppData\Local\LosslessExtract\Metadata\ on Windows.
Lossless Extract makes CD ripping genuinely simple. Drag in your disc, let MusicBrainz fill in the details, pick FLAC, hit Extract — and you’re done. Every track is a perfect digital copy of the original, tagged, named, and ready for your music server or media player.